Steps of RTC development is below:
- Skeleton Code Generation
- CMake (Generate platform specific project)
- Implementation
- Build
- Launch (Test)
Generate Skeleton Code
Use Eclipse with RTC Builder (RTCB). We also use RT System Builder (RTSE) to monitor the state condition of RTCs.
Please refer Install section of my manual to install Eclipse (with RTSE and RTCB).
RTC Builder
Launch Eclipse with RTCB.
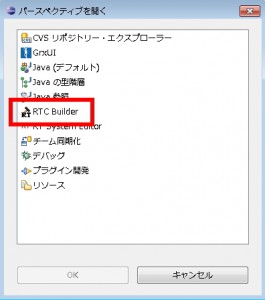
Then, select menu > “Window” > “Perspective” > “RTCBuilder”.
Select menu > “File” > “Open new Builder Editor”.
First you will be required to input your project name.
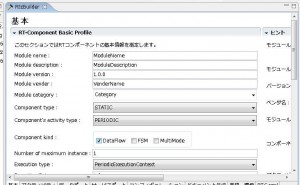
Then you can find the editor like following figure.
Let’s try the simplest RTC.
PERIODIC Component
Let’s make RTC which just output strings on console periodically.
RTC Builder
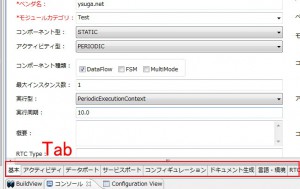
Select tabs below, and input configuration of your RTC. These are usual steps to build RTC.
| TAB | PARAMETER | VALUE |
| Basic | Module name | PeriodicConsoleOut |
| Module description | Periodic Console Out Component | |
| Module version | 0.0.1 | |
| Module vender | Your Name | |
| Module category | Your category (Test) | |
| Component type | STATIC | |
| Component Kind | Data Flow | |
| Component’s activity type | PERIODIC | |
| Number of maximum instance | 1 | |
| Execution Type | Periodic Execution Context | |
| Execution Rate | 1.0 | |
| Abstract | ||
| RTC Type | ||
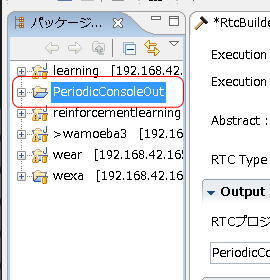
| Output Project | PeriodicConsoleOut | |
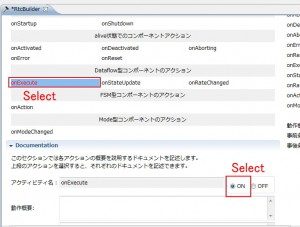
| Activity | on_execute | ON |
| Lang & Environemnt | Language | C++ / Java / Python |
Please check carefully to select activity.
Explanation of parameters (You do not need to read!)
- BASIC
- Module name … Component’s name. You can’t include white space.
- Module description … Component explanation
- Module version … Component’s version
- Module vendor … Component’s vendor. Put your name. You’re now a RTC vendor!!
- Module category … This is not important if you make one or small number of RTCs.
- Component type … STATIC, UNIQUE, COMMUNICATIVE. Not available now.
- Component’s activity type … PERIODIC, SPORADIC, EVENT_DRIVEN. Only PERIODIC is available
- Component Kind … Data Flow, FSM, Multimode. Now Data flow is the only alternative available.
- Number of maximum instance … Maximum
- Execution type … Execution Context’s type. Execution context will enable users to change execution timings of on_execute handler. PeriodicExecutionContext and ExtTrigExecutionContext is available in RTC Builder. Usually, choose PeriodicExecutionContext.
- Execution rate … Period of Execution. Unit is Hz.
- Abstract … Description of Component
- RTC type … RTC’s type. Not necessary.
- Output Project … Project Name. Maybe new version, unnecessary.
- Activity
- on_execute … An event handler that is executed periodically
- Lang. & Environment
- Language … OpenRTM-aist, C++, Java, Python
- if you use latest RTSE, check “Use old build environment”
Generate
Then push generate button.
Development
Select your programming language’s tab.
- .project … Eclipse’s project file.
- copyprops.bat … This script copies host PC’s own configuration from RTM_ROOT directory.
- CMakeLists.txt……Makefile
- PeriodicConsoleOut.conf…..Configuration Parameter. You can ignore now.
- src/PeriodicConsoleOut.cpp…..RT-Component’s Code.
- include/PeriodicConsoleOut/PeriodicConsoleOut.h…..RT-Component’s Header.
- src/PeriodicConsoleOutComp.cpp…… This file includes main function for launching the RTC as executable binary.
- README.PeriodicCOnsoleOut…. README file.
- rtc.conf…… Configuration file.
- RTC.xml ….. The setting is stored in this xml file. This is called RTC Profile.
CMake
VC++2010
Open “PeriodicConsoleOut_vc9.sln” file with VC2008.
Edit Source Code
Then, edit PeriodicConsoleOut.cpp file.
You can concentrate to onExecute function.
If you forgot checking the checkbox of “on_execute” in Activity tab of RTC builder, you must manually uncomment the onExecute function both in .cpp and .h.
/*
RTC::ReturnCode_t PeriodicConsoleOut::onActivated(RTC::UniqueId ec_id)
{
  std::cout << "onActivated Called." << std::endl;
  return RTC::RTC_OK;
}
RTC::ReturnCode_t PeriodicConsoleOut::onDeactivated(RTC::UniqueId ec_id)
{
  std::cout << "onDeactivated Called." << std::endl;
  return RTC::RTC_OK;
}

RTC::ReturnCode_t PeriodicConsoleOut::onExecute(RTC::UniqueId ec_id) {
  std::cout << "onExecute Called." << std::endl;
  return RTC::RTC_OK;
}
/*
RTC::ReturnCode_t PeriodicConsoleOut::onAborting(RTC::UniqueId ec_id)
{
  return RTC::RTC_OK;
}
*/ |
- src
- (デフォルトパッケージ)
- PeriodicConsoleOut.java
- PeriodicConsoleOutComp.java
- PeriodicConsoleOutImpl.java
- (デフォルトパッケージ)
- build_PeriodicConsoleOut.xml
- PeriodicConsoleOut.conf
- rtc.conf
- RTC.xml
You mainly edit ***Impl.java file.
I think you can not build java skeleton files. You need to add jar files to your project’s build-path.
Add “commons-cli-1.1.jar” and “OpenRTM-aist-1.*.jar”.
In Impl file, you can find onExecute function. This function is periodically called if RTC is Active state.
// @Override // protected ReturnCode_t onDeactivated(int ec_id) { // return super.onDeactivated(ec_id); // } /*** * * The execution action that is invoked periodically * former rtc_active_do() * * @param ec_id target ExecutionContext Id * * @return RTC::ReturnCode_t * * */ @Override protected ReturnCode_t onExecute(int ec_id) { System.out.println("Hello RT-Component!"); return super.onExecute(ec_id); } /*** * * The aborting action when main logic error occurred. * former rtc_aborting_entry() * * @param ec_id target ExecutionContext Id * * @return RTC::ReturnCode_t * * */ // @Override // public ReturnCode_t onAborting(int ec_id) { // return super.onAborting(ec_id); // } |
Generated files are ….
- .project… project configuration.
- .pydevproject…python configuration.
- PeriodicConsoleOut.conf….. RTC’s own setting file.
- PeriodicConsoleOut.py…..RTC’s source code.
- rtc.conf….. RTC’s configuration.
- RTC.xml….. Setting parameter of RTC Builder.
Edit PeriodicConsoleOut.py.
import sys import time sys.path.append(".") import RTC import OpenRTM_aist periodicconsoleout_spec = ["implementation_id", "PeriodicConsoleOut", "type_name", "PeriodicConsoleOut", "description", "Periodic Console Out", "version", "1.0.0", "vendor", "ysuga.net", "category", "Test", "activity_type", "STATIC", "max_instance", "1", "language", "Python", "lang_type", "SCRIPT", ""] class PeriodicConsoleOut(OpenRTM_aist.DataFlowComponentBase): # 思い切り中略! def onExecute(self, ec_id): """ The execution action that is invoked periodically former rtc_active_do() \param ec_id target ExecutionContext Id \return RTC::ReturnCode_t """ return RTC.RTC_OK |
You can concentrate onExecute function. This function is called periodically if the RTC is activated.
def onExecute(self, ec_id): print "Hello RT-Component!" return RTC.RTC_OK |
Let’s build! Is it okay??
rtc.conf
Before launching RTCs, you need to configure the RTC. Let’s edit “rtc.conf”.
In this file, you can configure….
- Execution period
- Address of Name Service (URL or IP address)
- Naming Rule
- Logger setting
- Setting of CORBA
Please add Name Server’s address like below:
Before
exec_cxt.periodic.rate:1.0
After
exec_cxt.periodic.rate:1.0
corba.nameservers: localhost
Launch RTCs
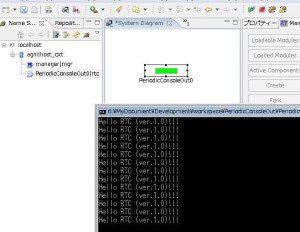
If you already read the pages about installation, you are already familiar with launching and activating RTCs. The sequence is…
- Launch Name Service
- Launch Eclipse (RT System Editor)
- Set Name Server’s address for RTSE (sometimes automatically detected)
- Launch RTC (F5 with VC2008)
- Connect RTCs with RT System Editor (you do not have to do here)
- Activate RTCs with RT System Editor
Change the execution period
In rtc.conf, “exec_cxt.periodic.rate” is setting for execution period (unit is Hz).
Column: Real Time?
You can imagine this normal RTCs do not support Real-Time execution period.
But if you use Linux and preemptive kernel, you can use Real-Time support.
Exit RTCs
Do not close DOS console window
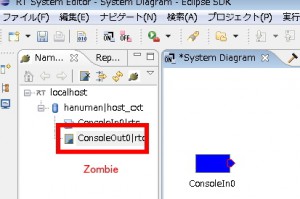
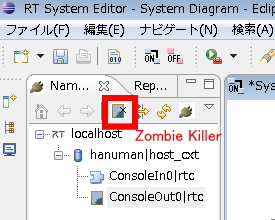
If you close the DOS console window with X button, your RTC will become ZOMBIE in the Name Service.
In your RT System Editor, Zombie killer button is available.
Example Codes
PeriodicConsoleOut_v10(C++)
PeriodicConsoleOutJava
PeriodicConsoleOutPy
